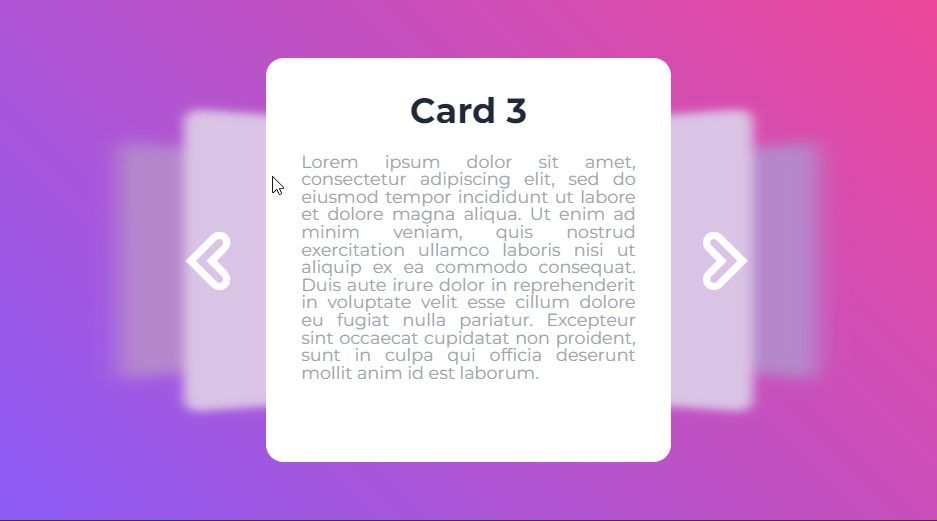
3D carousel in CSS is not a new thing, but if you don’t know about it, then today we will learn how to create a 3D carousel in CSS. We will create a beautiful 3d carousel with a little help from javascript. Sometimes it is necessary to put 3d looking elements to give the website a modern look.
What is a carousel?
A carousel is a slideshow of images or elements that users can select to direct them forward or backward in a slideshow. A 3D carousel is a 3D-looking slideshow of images or info. The 3D carousel makes the website more interactive.
Also, Read- Neumorphic Login form with Bootstrap 5
How to create a 3D Carousel in CSS?
We will follow the below steps to create a 3D carousel.
Step 1:
To create a 3d Carousel we will first create an index.html file and place the below code
<!DOCTYPE html>
<html lang="en">
  <head>
    <meta charset="UTF-8" />
    <meta http-equiv="X-UA-Compatible" content="IE=edge" />
    <meta name="viewport" content="width=device-width, initial-scale=1.0" />
    <link rel="stylesheet" href="style.css" />
    <title>3D Carousel in CSS</title>
  </head>
  <body>

    <script src="main.js"></script>
  </body>
</html>
We will use JavaScript to insert div tags and create our 3D carousel.
Step 2:
Now, we will create a style.css file and write the below code
body {
  width: 100vw;
  height: 100vh;
  display: flex;
  align-items: center;
  justify-content: center;
  overflow: hidden;
  background-image: linear-gradient(45deg, #8B5CF6, #EC4899);
  font-family: "Montserrat", sans-serif;
}

* {
  box-sizing: border-box;
}

.carousel {
  position: relative;
  width: 23rem;
  height: 23rem;
  perspective: 500px;
  transform-style: preserve-3d;
}

.card-container {
  position: absolute;
  width: 100%;
  height: 100%;
  transform: rotateY(calc(var(--offset) * 50deg)) scaleY(calc(1 + var(--abs-offset) * -0.4)) translateZ(calc(var(--abs-offset) * -30rem)) translateX(calc(var(--offset) / var(--abs-offset) * -5rem));
  filter: blur(calc(var(--abs-offset) * 1rem));
  transition: all 0.3s ease-out;
}

.card {
  width: 100%;
  height: 100%;
  padding: 2rem;
  background-color: hsl(280deg, 40%, calc(100% - var(--abs-offset) * 50%));
  border-radius: 1rem;
  color: #9CA3AF;
  text-align: justify;
  transition: all 0.3s ease-out;
}
.card h2 {
  text-align: center;
  font-size: 2rem;
  font-weight: bold;
  margin: 0 0 0.7em;
  color: #1F2937;
}
.card p, .card h2 {
  transition: all 0.3s ease-out;
  opacity: var(--active);
}

.nav {
  color: white;
  font-size: 5rem;
  position: absolute;
  display: flex;
  align-items: center;
  justify-content: center;
  top: 50%;
  z-index: 2;
  cursor: pointer;
  user-select: none;
  background: unset;
  border: unset;
}
.nav.left {
  transform: translateX(-100%) translatey(-50%);
}
.nav.right {
  right: 0;
  transform: translateX(100%) translatey(-50%);
}
Here we used a linear gradient as our background color.
Step 3:
Next, we will create a main.js file and write down the below code
import React, { useState } from 'https://cdn.skypack.dev/react';
import ReactDOM from 'https://cdn.skypack.dev/react-dom';
import { TiChevronLeftOutline, TiChevronRightOutline } from 'https://cdn.skypack.dev/react-icons/ti';

const CARDS = 10;
const MAX_VISIBILITY = 3;

const Card = ({ title, content }) => /*#__PURE__*/
React.createElement("div", { className: "card" }, /*#__PURE__*/
React.createElement("h2", null, title), /*#__PURE__*/
React.createElement("p", null, content));


const Carousel = ({ children }) => {
  const [active, setActive] = useState(2);
  const count = React.Children.count(children);

  return /*#__PURE__*/(
    React.createElement("div", { className: "carousel" },
    active > 0 && /*#__PURE__*/React.createElement("button", { className: "nav left", onClick: () => setActive(i => i - 1) }, /*#__PURE__*/React.createElement(TiChevronLeftOutline, null)),
    React.Children.map(children, (child, i) => /*#__PURE__*/
    React.createElement("div", { className: "card-container", style: {
        '--active': i === active ? 1 : 0,
        '--offset': (active - i) / 3,
        '--abs-offset': Math.abs(active - i) / 3,
        'pointer-events': active === i ? 'auto' : 'none',
        'opacity': Math.abs(active - i) >= MAX_VISIBILITY ? '0' : '1',
        'display': Math.abs(active - i) > MAX_VISIBILITY ? 'none' : 'block' } },

    child)),


    active < count - 1 && /*#__PURE__*/React.createElement("button", { className: "nav right", onClick: () => setActive(i => i + 1) }, /*#__PURE__*/React.createElement(TiChevronRightOutline, null))));


};

const App = () => /*#__PURE__*/
React.createElement("div", { className: "app" }, /*#__PURE__*/
React.createElement(Carousel, null,
[...new Array(CARDS)].map((_, i) => /*#__PURE__*/
React.createElement(Card, { title: 'Card ' + (i + 1), content: "Lorem ipsum dolor sit amet, consectetur adipiscing elit, sed do eiusmod tempor incididunt ut labore et dolore magna aliqua. Ut enim ad minim veniam, quis nostrud exercitation ullamco laboris nisi ut aliquip ex ea commodo consequat. Duis aute irure dolor in reprehenderit in voluptate velit esse cillum dolore eu fugiat nulla pariatur. Excepteur sint occaecat cupidatat non proident, sunt in culpa qui officia deserunt mollit anim id est laborum." }))));


ReactDOM.render( /*#__PURE__*/
React.createElement(App, null),
document.body);
Boom! You have it.
The source code is available at codepen.io
If you find this post helpful then please share and comment. It motivates me.


Thanks for sharing this amazing tutorial. Saved it.
Thank You 🙂